Modding Tips
Setting Segment Calls in Replaced Models
Segment calls are an important feature for a number of special effects (Texture scrolling, Fading in/out etc) to function correctly when replacing models. These Segment settings are not retained upon export via the Fast64 plugin. The exported files can be manually repaired by restoring the missing lines to the XML.
Match your new model's material structure to the original - reference the imported original; failure to properly match may leave you with broken models - when done, open each exported material, and at the end, just before the line:
<EndDisplayList/>
add:
<CallDisplayList Path=">0xZZ000000"/>
Which segment value is required differs by model, and which is used by which can be found in this spreadsheet: https://docs.google.com/spreadsheets/d/1U5ogFN-lUUkJ-yJVvMkO1eWF3l0zMaKI61qEOopbV4I/edit?gid=1210471824#gid=1210471824
The process has been automated with a terminal program for Windows and Linux, available here:
https://drive.google.com/drive/folders/1ho-0EbIEAO4CInZcMsVCfzQEJYvYKuSY
Windows: Drag and drop your Objects folder onto the executable.
Linux: Ensure the file is set as an executable, and run in a terminal from the location of the tool: ./Segment_Integrator_Linux "path/to/exported/objects/"
Note: The tool only supports Objects as of this writing. Objects with multiple Segment values are not supported by this tool; an error will display, prompting you to handle the files manually.
NOTE: If you are using Jameriquiah's Fast64 Fork, segcalls can be automatically added to your exported files via the segment checkboxes in the material settings, same rules stated above still apply.
Segment C on Link
Link in particular uses Segment 0x0C000000 specifically for one thing, it handles his reflection in the Water Temple's Dark Link room.
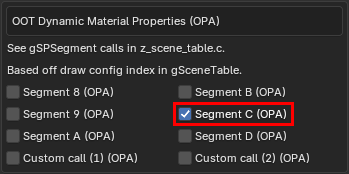
Setting up custom model's for this is pretty easy, and if you don't do it then your character's reflection will be flipped inside out. For Link and all of his equipment, enable Segment C in your material settings for each material.
Then in the Geo tab in the Fast64 material settings, ensure that both Cull Front AND Cull Back are both turned off.
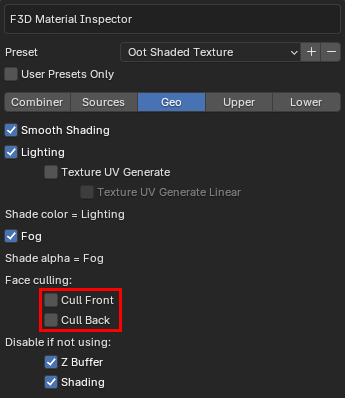
For materials that you want backface culling always off for, such as the inside of a skirt, or any geometry that you don't want to be 1 sided, keep both culls disabled but also disable Segment C just for that material.
Any materials that use transparency such as translucency or cutouts, EXCEPT decals those are fine, will not be able to pass through Segment C and will need Segment C disabled or else they will cause all sorts of graphical glitches on the reflection. If you want these materials to not be flipped inside out in the reflection, the only option is the disable Segment C and disable both Cull Front and Cull Back.
Exploding "Body Break" Enemies
Modders seeking to replace enemies must be aware that to prevent vertex explosion on all enemies using the "body break" system will require the mesh to be designed to support it. This means all 'part' meshes should be skinned exclusively to one joint; you cannot skin one contiguous mesh surface across two or more joints that break apart. Joints that do not break apart can be skinned as normal. Enemies that utilise the "body break" system:
- Iron Knuckles (en_ik)
- Stalfos (en_test)
- Stal Children (en_skb)
- Shell blade (en_sb)
- Tektites (en_tite)
- Bubbles (flying skulls) (en_bb)
Dev comments: https://github.com/HarbourMasters/Shipwright/pull/3436#issuecomment-2252886376
Flipbooks
Of all aspects of custom model creation, the most finicky is the "flipbooks" - the swapping textures used for animating character faces. Link is obviously the most complicated, so here are the exact names and settings required. Note that the texture dimensions can differ from the ones shown in the screencaps, but must be set to the correct dimensions for your texture files.
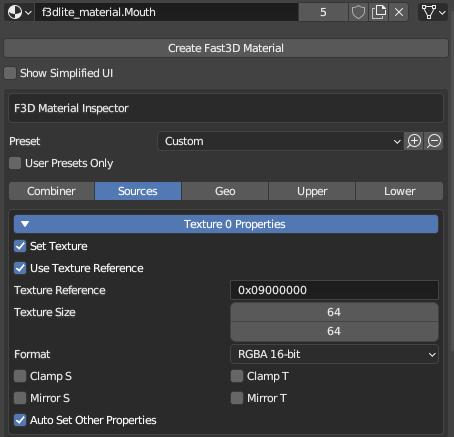
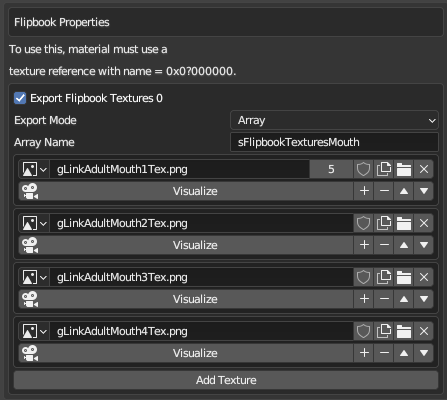
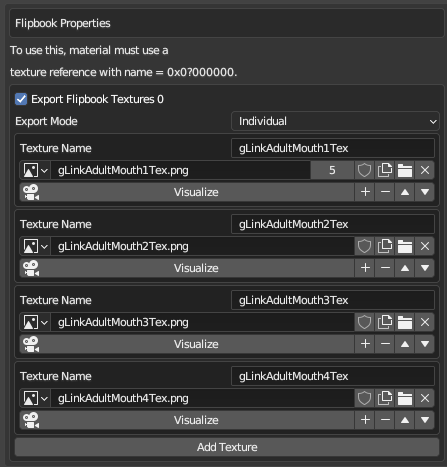
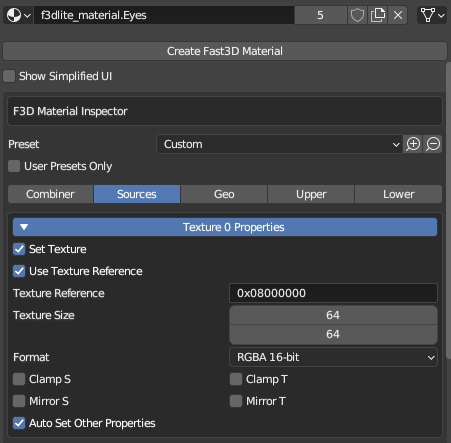
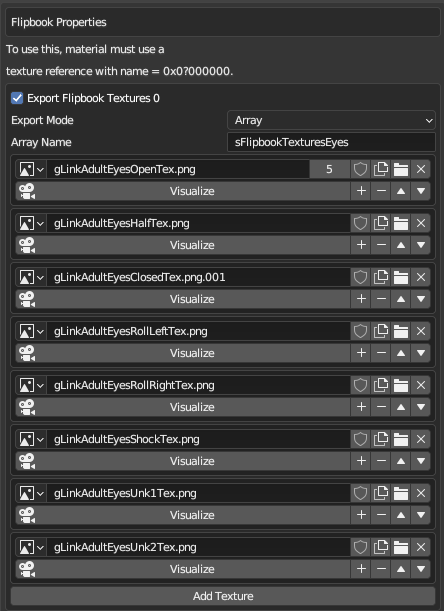
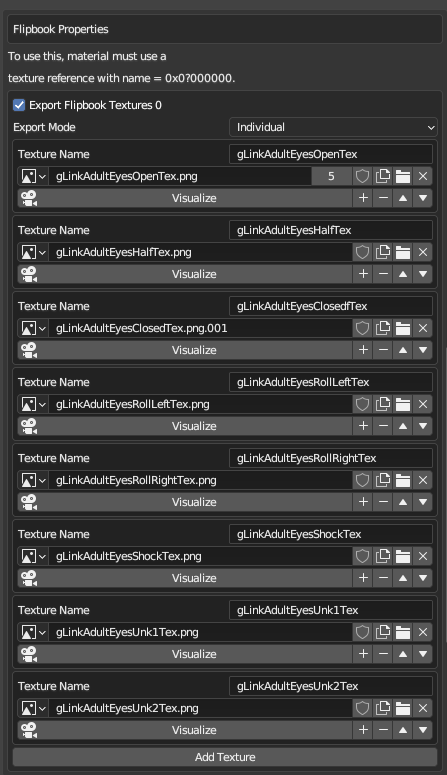
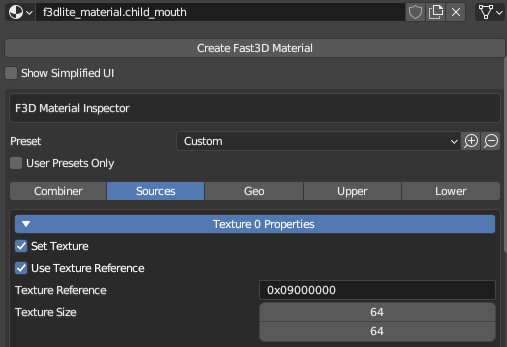
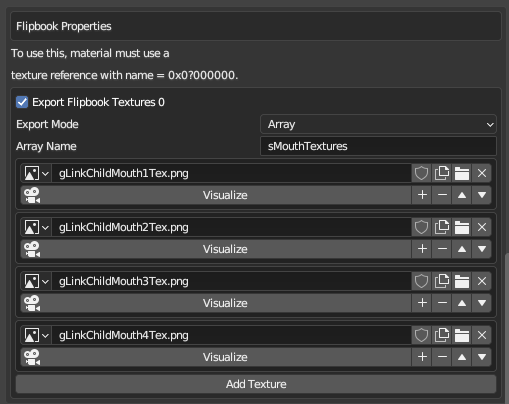
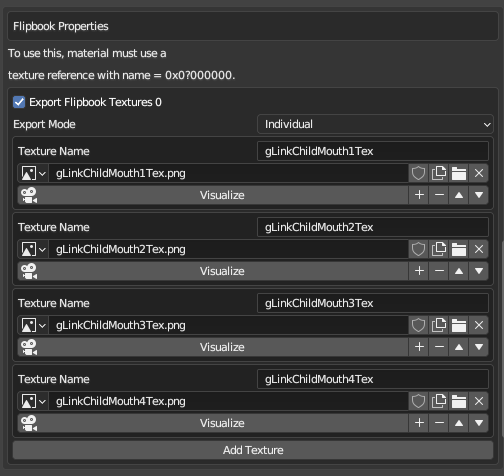
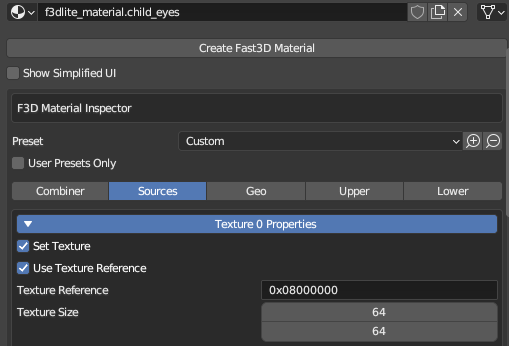
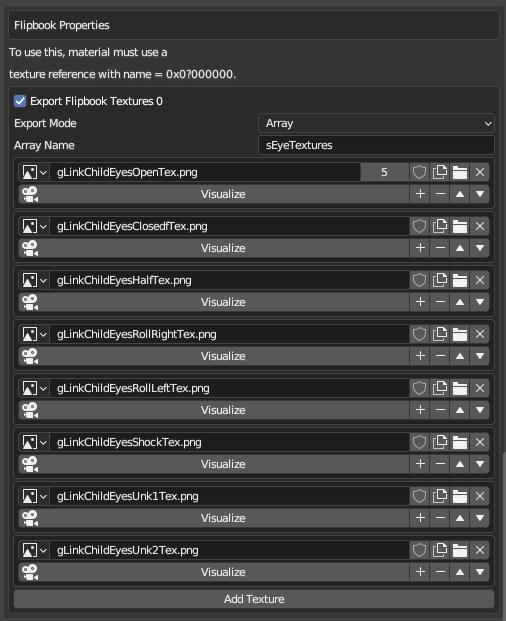
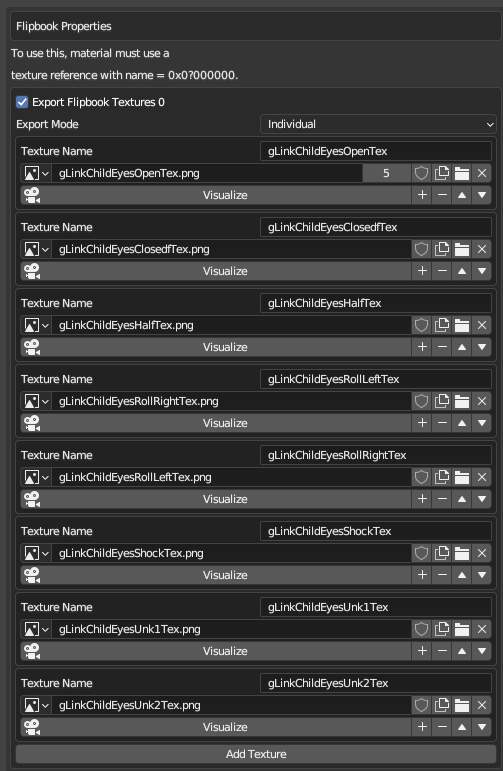
For a more in-depth tutorial on setting up flipbooks for your custom character, see the Link Flipbooks Guide
HD Textures on Custom Models
To put HD textures on custom models, you must first create the mod archive with SD textures, then extract the mod archive as you would to create a vanilla texture mod, following the process to unpack your mod archive instead of the source asset archive.
The goal becomes making an HD texture mod of your mod.
You cannot unpack archives that already have HD textures; the tools are incompatible.
Texture Sheets Are a Thing of the Future
When OoT/MM were designed, the modern practice of texture sheets were not standard; the N64 is better at handling several small textures in multiple materials for one object than one sheet of multiple combined textures for one or more objects.
While not strictly required, it is best to work the way the game expects when possible, and doing things in this way will help to keep things in the "SD" range without having to compromise on detail.
Requirements:
- Limit custom textures to power-of-two dimensions
- No bigger than 64x64 for export from Blender
- 32x32 is recommended as 64x64 won't always work correctly
Multiple Meshes; One Object
When dealing with models for SoH/2S2H, you can use as many contiguous mesh surfaces as you need to, but they must all be joined into a single object for export.
They do not need to be physically connected into a single contiguous surface.
If you have NO contiguous geometry skinned across two joints, the export will set the skeleton incorrectly. If your character model is entirely constructed of segmented pieces, you should include a piece of geometry to fulfill this condition - skin a single piece of geometry across two joints. This geometry can be hidden with a double-culled invisible material as with other filler geometry.
You do not need to do this if your character model already has contiguous geometry skinned across multiple joints.
Something for Every Bone
When creating a player character model, all of Link's vanilla bones must have something skinned to them, even if you do not intend to make use of it. Commonly missed bones are for the collar of Link's tunic, and the scabbard on Link's back.
You can create null geometry for these bones by adding some new geometry, such as a simple plane, and assigning a material to it that culls both front and back faces.
Attaching Custom Boots/Bracelet to Modified Skeleton
For gauntlets and boots, the game anchors them into place using a matrix call, which can tell the game which bone something it supposed to draw from. Many DL's like hands and equipment don't need this but boots and gauntlets will need a matrix call in order to not draw at the root bone of the model.
This can easily be handled within Fast64 in the DL Exporter tab, simply add a new entry with the + button and select the bone you want the DL attached to from the dropdown menu.
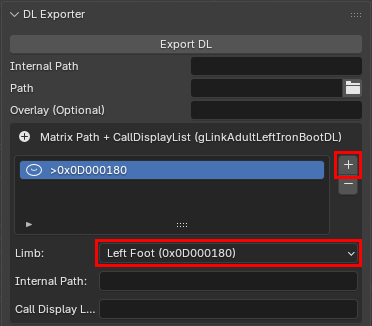
The original matrices these DL's use in vanilla should be pretty self-explanatory but just incase:
gLinkAdultRightIronBootDL - Right Foot
gLinkAdultLeftHoverBootDL - Left Foot
gLinkAdultRightHoverBootDL - Right Foot

gLinkAdultLeftGauntletPlate1DL - Left Arm
gLinkAdultLeftGauntletPlate2DL - Left Hand
gLinkAdultLeftGauntletPlate3DL - Left Hand
gLinkAdultRightGauntletPlate1DL - Right Arm
gLinkAdultRightGauntletPlate2DL - Right Hand
gLinkAdultRightGauntletPlate3DL - Right Hand

:::tip
You can also use this feature to change which bone a specific DL is anchored to, even bones that do not normally require a matrix call. So for example, you can use this to turn something like a mask, into something that goes on the torso.
:::

### Alignment Process

1. In Blender, align the meshes (boots, etc.) to fit over the player model
2. Set the origin point of the mesh to the PIVOT point of the bone you wish to lock the mesh to
3. Rotate the object to counter-act rotation that Ocarina of Time applies (boots need 180° X and 270° Z)
4. Export as the proper DL from the asset sheets
5. Add the matrix code line as shown above
6. Pack into OTR and test in-game, adjusting rotation as needed

## Alt Equipment (Custom Items)

The Alt Equipment system allows for custom item replacements. Export different items to a new internal folder at `object/object_custom_equip`.

For all new DisplayLists and what to export different items as, see this spreadsheet: https://docs.google.com/spreadsheets/d/1rOTt_7Wr0OGfMR9tHom8dDOooM3rUocz9xi7axpR0sY/edit?gid=556482990#gid=556482990

Exporting as a custom object makes Ship handle the hand merging and other fancy effects.

**Division of Responsibilities:**
- People making player models should provide custom FPS hands with their mod: `gCustomAdultFPSHandDL` or `gCustomChildFPSHandDL`
- People making item mods should only provide the items

## Environment Mapped Shiny Effects

To add a shiny/reflective effect to a mesh:

1. In edit mode, select the mesh you want a shine on and duplicate it (don't move it)
2. Create a new material and select **Environment Mapped Transparent** preset
3. Assign the duplicated mesh to the new material
4. Import your texture image (use textures with alpha)
5. In Color Combiner, change Cycle 1 D Alpha from `1` to `Texture 0 Alpha`
6. In Lower settings (Show Simplified UI disabled), change Render Mode Cycle 2 to `Transparent Decal`

## Adding Expressions to Animations

To add eye and mouth expressions to an animation that doesn't have any:

1. Make sure you're on frame 0
2. Go to the Object Properties tab with your skeleton selected
3. Press `I` on top of the Eyes and Mouth parameters to add keyframes for both
4. Open the Graph Editor - you'll see them added
5. Select both and right-click, then group them together
6. Name the group "Texture Animations"
7. Press `A` to select all keyframes, then press `T` and select **Constant** to fix interpolation