Creating Flipbooks For a Custom Character
What are Flipbooks?
Flipbooks are sets of textures that are called by character animations for things like facial expressions. In Link's case, he has flipbook textures for his eyes and mouth.
This segment will cover how to replace Link's flipbooks specifically, but the given workflow should be more or less the same for other characters as well.
This guide is for exporting custom flipbooks, but if you would rather reuse the vanilla flipbooks, refer instead to this section of the guide.
Step 0 - Setup
Each Link has 12 flipbooks textures total--8 eyes and 4 mouths. Before starting, make sure you have all the necessary expressions ready. Each eye texture should be of the same dimensions and each mouth texture should be of the same dimensions. Each texture should be its own .png file. You can find the names and descriptions for all of Link's face textures at the flipbook table below. The texture names will be very important for exporting, so keep this up as you work.
Step 1 - Material Setup
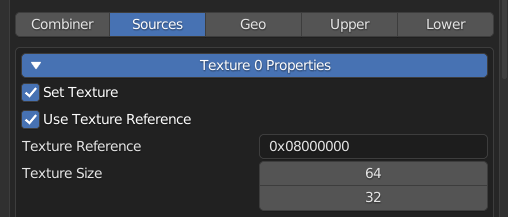
Go to the eye material for your player model, and make sure you have a texture set for the eyes (best practice is to just use the neutral eyes-open texture). If you are using a Color-Indexed format, make sure you set your desired number of colors now; you can ignore the TLUT name for now. Underneath "Set Texture" select "Use Texture Reference" and in the box type 0x08000000 as your texture reference. This is what links the eye textures to this material. Set the texture size to match the dimensions of your eye textures. If you are using a Color-Indexed format you may now input your desired TLUT path in the "Palette Reference" box. Note that the entire path of the TLUT must be typed in, not just the name (ie objects/object_link_boy/gEyesTLUT instead of just gEyesTLUT).
Next, scroll down in your material settings to where it says "Flipbook Properties" and click "Export Flipbook Textures 0". Set the Export Mode to Array if it is not already and type in a name for the array (doesn't really matter what you put so long as it's unique). Now switch the Export Mode to Individual.
Step 2 - Setting Textures
For each eye texture in the flipbook table for your corresponding Link: Click on "Add Texture" and where it says "Texture Name" copy and paste the name from the table. Now set this texture to use the png you set up for this expression (you will likely have to hit "Open" and navigate to where you have the texture stored on your device). You can now hit "Visualize" if you want to check how the expression looks on your model.
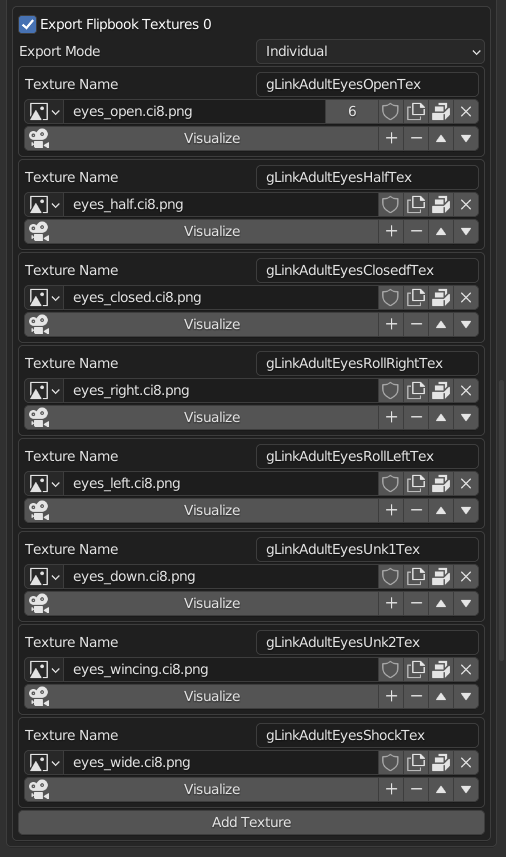
Your textures will not work in-game unless the names match exactly with the table below. Pay close attention to the fact that the name of the closed-eyes texture says ClosedfTex instead of ClosedTex. This is not a mistake in the table, just one of many typos in the game itself. This is why it is recommended to copy and paste directly from the table rather than retyping it yourself.
Step 3 - Mouth
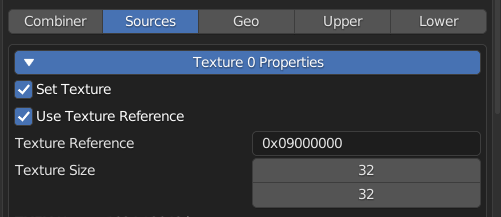
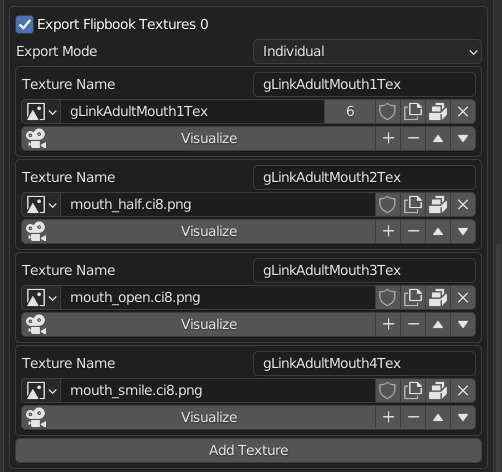
Repeat Steps 1 and 2, but when inputting the Texture Reference use 0x09000000 instead. Just like with the eyes, this is what links the mouth textures to this material. Other than that, all steps are the same, just with your mouth textures and names rather than the eyes. Also use the dimensions of the mouth textures when inputting the texture size.
Step 4 - Export
With your flipbooks now set up, you may export your skeleton like normal. Check some of Link's animations to make sure all of the textures exported correctly. If everything looks good, then congratulations, you have successfully applied flipbooks to your model!
If something looks wrong, please refer to the next step.
Step 5 - Issue Correction
First, look back through each previous step and ensure you have followed each of them exactly. The most common issues tend to be:
- Not setting a texture before checking "Set Texture Reference"
- Not setting the correct texture reference (
0x08000000for eyes,0x09000000for mouth) - Setting the wrong texture size (should match the size of the corresponding textures; top number is the number of horizontal pixels and the bottom number is the number of vertical pixels)
- Using textures too large for fast 64 to pack (generally nothing larger than 64x64)
- Using the wrong texture names (should match exactly with the names in the flipbook table, including the 'f' for the eyes-closed texture)
- Exporting on Array Mode instead of Individual - Always make sure your flipbooks are set to Individual mode before exporting
- Textures are off-color - make sure the actual image file is 32-bit, not 64
- Not properly setting a TLUT name when using a Color-Indexed format - The full path of the TLUT should be placed in the "Palette Reference" box
- Not properly setting the number of colors when using a Color-Indexed format - Uncheck "Set Texture Reference" and set the number of colors in the "Color Count" box. Then re-check the "Set Texture Reference" box
- Colors being corrupted when using RGBA-16 - We still don't fully understand why this happens, but it seems to be fixed by resizing your textures to be 64x64
If you are still having issues, feel free to ask for help in the soh-modding-discussion channel on the HM64 discord server.
Vanilla Flipbooks
Navigate to the material for your eyes and set your texture to something with the same dimensions (64x32) as the vanilla eyes (I recommend just using the eyes-open texture from decomp to avoid any potential issues). Next, change your texture format to "Color-Indexed 8-Bit" if it is not already and make sure the Color Count is 255. Now check the "Set Texture Reference" box and set the texture reference to 0x08000000 and the texture size to 64 and 32 respectively. In the palette reference box, enter objects/object_link_boy/gLinkAdultHeadTLUT if doing Adult Link or objects/object_link_child/gLinkChildSkinTLUT if doing Child Link.
Repeat all the same steps for the mouth, except here the texture reference should be 0x09000000 and the dimensions of the texture are 32x32 (meaning texture size should have 32 in both boxes).
And that's it! You can now export your skeleton like normal and it in-game it should use vanilla link's flipbook textures.
Link Flipbook Table
| Directory | Texture Name | Description |
|---|---|---|
| objects/object_link_child | gLinkChildEyesOpenTex | Eyes open |
| objects/object_link_child | gLinkChildEyesHalfTex | Eyes half-open (mid-blink) |
| objects/object_link_child | gLinkChildEyesClosedfTex | Eyes closed |
| objects/object_link_child | gLinkChildEyesRollRightTex | Eyes facing to the RIGHT of the image |
| objects/object_link_child | gLinkChildEyesRollLeftTex | Eyes facing to the LEFT of the image |
| objects/object_link_child | gLinkChildEyesUnk1Tex | Eyes looking down |
| objects/object_link_child | gLinkChildEyesUnk2Tex | Eyes closed hard / wincing |
| objects/object_link_child | gLinkChildEyesShockTex | Eyes wide open |
| objects/object_link_child | gLinkChildMouth1Tex | Mouth closed |
| objects/object_link_child | gLinkChildMouth2Tex | Mouth half-open |
| objects/object_link_child | gLinkChildMouth3Tex | Mouth open |
| objects/object_link_child | gLinkChildMouth4Tex | Mouth smiling |
| objects/object_link_boy | gLinkAdultEyesOpenTex | Eyes open |
| objects/object_link_boy | gLinkAdultEyesHalfTex | Eyes half-open (mid-blink) |
| objects/object_link_boy | gLinkAdultEyesClosedfTex | Eyes closed |
| objects/object_link_boy | gLinkAdultEyesRollRightTex | Eyes facing to the RIGHT of the image |
| objects/object_link_boy | gLinkAdultEyesRollLeftTex | Eyes facing to the LEFT of the image |
| objects/object_link_boy | gLinkAdultEyesUnk1Tex | Eyes looking down |
| objects/object_link_boy | gLinkAdultEyesUnk2Tex | Eyes closed hard / wincing |
| objects/object_link_boy | gLinkAdultEyesShockTex | Eyes wide open |
| objects/object_link_boy | gLinkAdultMouth1Tex | Mouth closed |
| objects/object_link_boy | gLinkAdultMouth2Tex | Mouth half-open |
| objects/object_link_boy | gLinkAdultMouth3Tex | Mouth open |
| objects/object_link_boy | gLinkAdultMouth4Tex | Mouth smiling |