Rigged DLs
This technique lets you replace any of Link's object Display Lists (DLs) with a fully rigged custom model that deforms across multiple bones — rather than being locked to a single bone like a static DL.
The guide uses the Iron Boots as an example, but this works with any of Link's DLs including masks, swords, shields, and held items.
This technique cannot unload any part of Link's existing model. Account for clipping if your mesh overlaps Link's geometry (e.g. boots over feet).
You must rig at least something to every bone on Link's armature, or Blender will not export correctly.
Steps
1. Model your mesh over Link
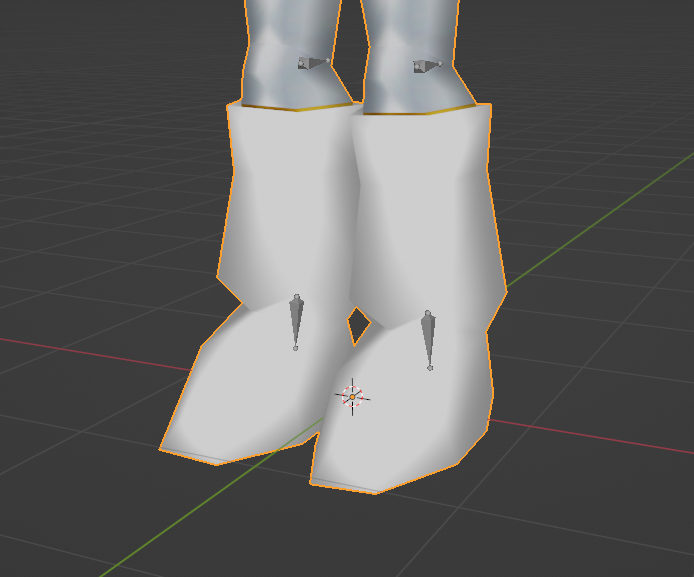
Import Link into Blender (or build off an existing model) and create your new mesh, fitting it to Link as if he were wearing or using it.
2. Rig the mesh
Rig your mesh to the bones it should deform with. Remember: every bone on the armature must have at least one vertex weight assigned.
3. Export the skeleton
Back up your original .blend file, then delete Link's mesh — keep the armature. Export the skeleton the same way you would export Link's normal skeleton, with two differences:
- Give it a unique name, e.g.
gLinkIronBootsSkel - Set a unique object path, e.g.
object_link_boy_ironboots
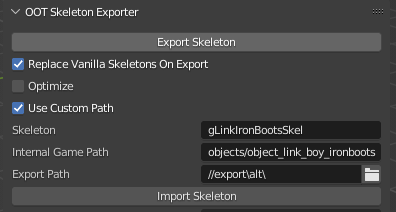
Export into its own separate folder. Do not mix it with any existing Link skeleton exports or they will overwrite each other.
4. Create the replacement DL XML
Now create the XML file that replaces Link's original DL. This file goes inside object_link_boy or object_link_child — not inside the folder you just exported your skeleton into.
Create a new text file and paste in this base template:
<DisplayList Version="0">

	<PipeSync/>
	<SetGeometryMode G_LIGHTING="1" />
	<ClearGeometryMode G_TEXTURE_GEN="1" />
	<SetCombineLERP A0="G_CCMUX_0" B0="G_CCMUX_0" C0="G_CCMUX_0" D0="G_CCMUX_SHADE" Aa0="G_ACMUX_0" Ab0="G_ACMUX_0" Ac0="G_ACMUX_0" Ad0="G_ACMUX_ENVIRONMENT" A1="G_CCMUX_0" B1="G_CCMUX_0" C1="G_CCMUX_0" D1="G_CCMUX_SHADE" Aa1="G_ACMUX_0" Ab1="G_ACMUX_0" Ac1="G_ACMUX_0" Ad1="G_ACMUX_ENVIRONMENT"/>
	<Texture S="65535" T="65535" Level="0" Tile="0" On="0"/>
	<EndDisplayList/>
</DisplayList>
5. Fill in the bone assignments
Each bone your mesh uses needs two lines inserted before <PipeSync/>:
- A
Matrix Pathline — tells the DL which bone to attach to (see the bone reference table) - A
CallDisplayListline — tells the DL which mesh part to load on that bone
The CallDisplayList format is:
<CallDisplayList Path="objects/object_link_boy_XXXXXX/boneXXX_gLinkXXXXXX_mesh_layer_Opaque"/>
Replace the X placeholders with the bone file names from your export folder. Use the filenames as-is — ignore any ending in _tri_X or _vtx_X. Make sure the folder name in the path matches the folder you exported your skeleton into.
To add more bones, repeat the Matrix Path + CallDisplayList pair for each one.
6. Examples
Left Iron Boot — rigged across left thigh, shin, and foot:
<DisplayList Version="0">
	<Matrix Path=">0x0d000100" Param="G_MTX_LOAD"/>
	<CallDisplayList Path="objects/object_link_boy_ironboots/bone006_gLinkAdultLeftThighLimb_mesh_layer_Opaque"/>
	<Matrix Path=">0x0d000140" Param="G_MTX_LOAD"/>
	<CallDisplayList Path="objects/object_link_boy_ironboots/bone007_gLinkAdultLeftLegLimb_mesh_layer_Opaque"/>
	<Matrix Path=">0x0D000180" Param="G_MTX_LOAD"/>
	<CallDisplayList Path="objects/object_link_boy_ironboots/bone008_gLinkAdultLeftFootLimb_mesh_layer_Opaque"/>
	<PipeSync/>
	<SetGeometryMode G_LIGHTING="1" />
	<ClearGeometryMode G_TEXTURE_GEN="1" />
	<SetCombineLERP A0="G_CCMUX_0" B0="G_CCMUX_0" C0="G_CCMUX_0" D0="G_CCMUX_SHADE" Aa0="G_ACMUX_0" Ab0="G_ACMUX_0" Ac0="G_ACMUX_0" Ad0="G_ACMUX_ENVIRONMENT" A1="G_CCMUX_0" B1="G_CCMUX_0" C1="G_CCMUX_0" D1="G_CCMUX_SHADE" Aa1="G_ACMUX_0" Ab1="G_ACMUX_0" Ac1="G_ACMUX_0" Ad1="G_ACMUX_ENVIRONMENT"/>
	<Texture S="65535" T="65535" Level="0" Tile="0" On="0"/>
	<EndDisplayList/>
</DisplayList>
Right Iron Boot — rigged across right thigh, shin, and foot:
<DisplayList Version="0">
	<Matrix Path=">0x0d000040" Param="G_MTX_LOAD"/>
	<CallDisplayList Path="objects/object_link_boy_ironboots/bone003_gLinkAdultRightThighLimb_mesh_layer_Opaque"/>
	<Matrix Path=">0x0d000080" Param="G_MTX_LOAD"/>
	<CallDisplayList Path="objects/object_link_boy_ironboots/bone004_gLinkAdultRightLegLimb_mesh_layer_Opaque"/>
	<Matrix Path=">0x0d0000C0" Param="G_MTX_LOAD"/>
	<CallDisplayList Path="objects/object_link_boy_ironboots/bone005_gLinkAdultRightFootLimb_mesh_layer_Opaque"/>
	<PipeSync/>
	<SetGeometryMode G_LIGHTING="1" />
	<ClearGeometryMode G_TEXTURE_GEN="1" />
	<SetCombineLERP A0="G_CCMUX_0" B0="G_CCMUX_0" C0="G_CCMUX_0" D0="G_CCMUX_SHADE" Aa0="G_ACMUX_0" Ab0="G_ACMUX_0" Ac0="G_ACMUX_0" Ad0="G_ACMUX_ENVIRONMENT" A1="G_CCMUX_0" B1="G_CCMUX_0" C1="G_CCMUX_0" D1="G_CCMUX_SHADE" Aa1="G_ACMUX_0" Ab1="G_ACMUX_0" Ac1="G_ACMUX_0" Ad1="G_ACMUX_ENVIRONMENT"/>
	<Texture S="65535" T="65535" Level="0" Tile="0" On="0"/>
	<EndDisplayList/>
</DisplayList>
7. Save and pack
Save the XML file inside object_link_boy or object_link_child with the exact DL name from the asset guide and no file extension.
For the Iron Boots example:
objects/object_link_boy/gLinkAdultLeftIronBootDLobjects/object_link_boy/gLinkAdultRightIronBootDL
Pack into an O2R/OTR and load in Ship. If everything is set up correctly, your object will now be a fully rigged model that deforms with Link's skeleton.